How to turn on AutoSave in Word on all platforms
Have you ever lost hours of hard work done on a Word document? With Microsoft Word being the most popular text processor on the planet, one needs to know how to turn on AutoSave in Word. AutoSave is a very important feature that can effectively save and protect your typed work.

Source: Original
Microsoft has a feature that automatically saves your work as you progress. It is a highly useful feature in case you forget to save your work or if your system crashes.
How to turn on AutoSave in Word
If you are working on Windows, the Word AutoSave location is easily accessible. By default, the AutoSave function is on. It automatically saves your work every 10 minutes. For better control of the period, you can change this value. Here are the steps to do this:

Source: Original
- Launch the application then click File
- Scroll down the File menu, and select Options
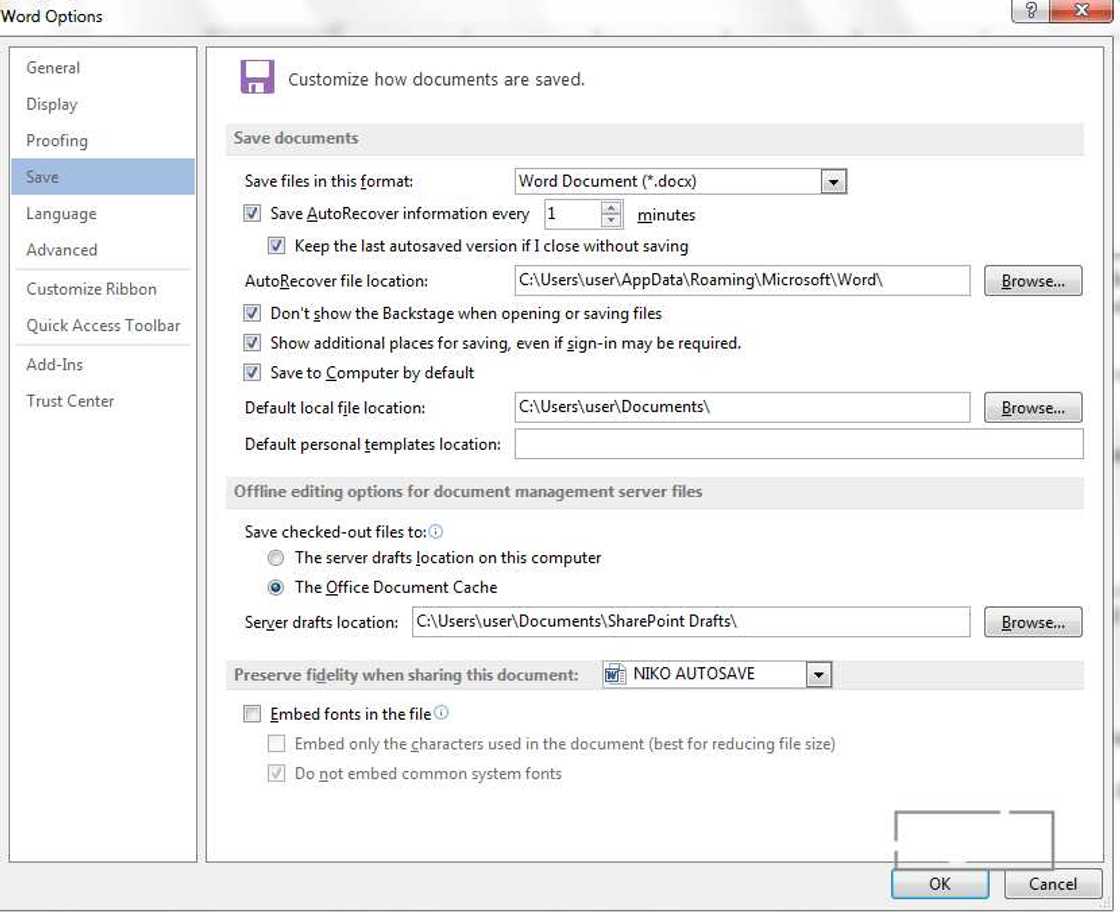
- On the dialogue box, tick the Save AutoRecovery information every box is on. Here you can adjust the amount of time before AutoSaving
How do I AutoSave in Word 365?

Source: Original
The good news is that Office 365 offers automatic AutoSave features on Word, Excel, and PowerPoint. This means that all work done with the three office tools are saved automatically within seconds.
How do I enable AutoSave in Word 2016?

Source: Original
You can turn AutoSave on Word 2016 through the following simple steps:
- Step 1: Launch the Application
- Step 2: Click on the “File” icon located on the top left side
- Step 3: Scroll down to the “Option” icon and click it
- Step 4: Click on the “Save” option. This will open a box of options that you can edit based on your typing abilities.
- Step 5: Click to tickthe option “Save AutoRecover information every."
READ ALSO: How to type roman numerals on Mac and PC
To continue with work that you had saved after an unexpected incidence such as power shortage, you can click on the "Keep the last AutoSaved version if I close without saving" to retain the saved work. You also get to decide where the AutoRecoverd files get to be saved based on your preferences.
How do I turn off AutoSave in Word Mobile?
Thanks to technological advancements, different smartphones and tablets come bearing the Word Office feature. If you are using an Android phone, the Save features are automatically active on default settings. You can turn it off by following the below steps:
- Tap on the “File” icon
- Scroll to the “Save Option” and tap on it
- You will see the “AutoSave” icon is “On.”
- Turn it to “Off.”
For iOS users who might be using an iPad or iPhone smartphone, documents are saved automatically. Unlike Android users, iOS Word-Office users cannot see the “Save” icon. You can prevent the automatic process by following the two steps below:
- Select “File”
- Move the “AutoSave" option to the opposite side until it reads "Off."
By doing this, iOS users will now see the “Save” option whenever they look at the “File” menu.
Where can I find AutoSaved Word documents?

Source: Original
The good news is that text documents are designed to AutoSave after every ten minutes. This can be increased or decreased based on preference. Let us take an example that most people face, a computer experiencing a malfunction that forces the desktop to shut down on restart, how can you recover through AutoSave?
- Restart your computer
- Open the application
- Go through the list of all recovered documents. This list is available on the left side of the screen under the blank document section
- Click on the specific text title that will open
Note: There are situations where you might completely lose your work. This primarily occurs for work that has been done 10 minutes after or before the automated saving occurs. Due to this, it is advisable to ensure that you use the right settings based on your preference.
How to turn on autosave on MacOS
MacOs applies both automatic AutoSave in a period of 5 minutes, and a Versions feature to enable you to preview the before and after documents so as to identify the changes made in your text easily. You can disable the feature if you wish to.
How to turn on AutoSave in Word is a major hack that everybody should know how to implement to avoid losing lengthy or essential information. This is applicable across all platforms such as Android, iOS, and Windows.
READ ALSO: How to save a Word document as a PDF
Source: Legit.ng


